Make your own soup stock (Vegan)

So many recipes call for soup stock and the store-bought kind is boring and sodium-tastic. Make your own! It’s easy and it will make all of your recipes vastly more delicious. The trick is just to try new things, remember what works, write it down, and pair it wisely with the other ingredients in the dish you are cooking. More on that in a moment. First, how to make a stock:

  • Put a lot of water in a large pot
  • Bring the water to a boil
  • Throw in a lot of vegetables, scraps of vegetables, and/or their parts. For instance, corn cobs & onion skins are great in stocks, in case you didn’t know. So you don’t need to do a lot of cutting or peeling or prepping. Just chop things roughly, enough so that they fit in the pot and have exposed parts through which to leak their juices
  • Simmer everything for about an hour or so
  • Add salt and pepper while simmering, to taste

When the stock is done, allow to cool and then pour through a strainer to separate the vegetable parts from the stock. This will probably require doing it in batches. Discard the vegetables and refrigerate or freeze the stock until it’s ready for use.

What kind of vegetables can go in a stock? Pretty much anything you want, though some veggies are more reliable than others. Some general guidelines:

#1 – Follow the rules of compost: No citrus. No fats. Nothing diseased or spoiled.

Whenever possible, use onion, celery, carrots, thyme and garlic. As much or as little of any of these, but some combination thereof. For the garlic, just smash the clove, no need to peel or press it. I take a blunt object and crack it a couple of times. I usually throw in 4 large cloves per 5 qt stockpot.

Other strong contributors to stock excellence include: potatoes (any variety), brussel sprouts, spinach, lettuce, cabbage, tomatoes, beets, parsley, corn, parsnips, mushrooms, zucchini, and … ??? Totally up to you and what you’re willing to experiment with.

Now. As for the pairing of stock with recipe. Basically I just taste it and imagine what it would complement. It’s not hard. It may seem weird, and some of you who are sensory-challenged may be fearful, but trust me. You really can tell by the taste of a stock what its purpose in life is. And most of the time, stock is so mild, all it can do is enhance, not detract. Just be mindful of the ingredients you’re dealing with, and I am confident you’ll be happy with your results.
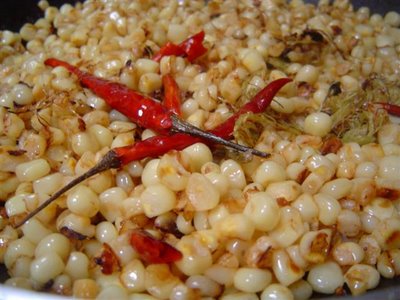
Esquites, aka Mexican Street Corn (Vegan)

Oh, I do love me some esquites. The less messy-to-eat sibling of elote(Mexican style corn on the cob), esquites takes a delicious treat and puts it in a bowl or cup so that the people who love it more than words can express are able to eat twice as much twice as fast in huge spoonfuls. MMMMMMMMMM.

From Tlazolcalli cucina

Mmmmmmsquites (pic from Tlazolcalli cucina)

Unfortunately, authentic esquites is made with a million pounds of butter and has about a Jesus-kabillion calories. And baby, that just ain’t cool.

So, here’s my vegan version, which boasts zero butter and a totally non-biblical proportion of calories. Easy to make, low fat, low cal and fun at parties. What more could you want?

Esquites

  • Corn from 4 cobs (around 3 cups) – if you haven’t cut corn from the cob, watch a quick tutorial. (If necessary, you can also use frozen or canned corn.)
  • 3 tbsp olive oil
  • 1 lime
  • 1 tbsp serrano pepper, seeded and minced
  • 1/4 – 1/2 tsp cayenne (to taste)
  • 2 – 3 tbsp vegan mayo
  • Salt to taste

Heat a medium size frying pan or sauce pan over medium heat. Add olive oil and heat a few moments longer until oil is hot. Combine the corn and pepper and stir until evenly coated with oil. Heat for a few minutes, stirring regularly, until corn becomes fragrant. Squeeze in juice from one lime. If it’s not a very juicy lime, consider adding another. Add cayenne and a bit of salt and taste. If necessary, add more salt and cayenne and mix well.

At this point, you have a choice. You could serve it as is, which I personally find delicious, or you could complete the last step of adding the mayo. If you add the mayo, it will obviously be differently delicious, and most people probably prefer it that way. And it’s also more true to the authentic esquites experience. However, not including a barrel of butter is totally inauthentic, so don’t kid yourself too much.

Oh, one last thing. If you want the corn to have a more “roasted” flavor and appearance, you can start by searing it, removing it from heat, and then proceeding through the steps described above.

Basil Guacamole (Vegan)

Consider adding basil to your guacamole. It adds a lovely dimension of freshness. Or if you’d prefer not, omit the basil and just have guacamole. Either way, here’s a quick and easy recipe.

Basil Guacamole

  • 3 avocados
  • 1 lime
  • 1/3 c. red onion, chopped and rinsed
  • Salt to taste
  • 1 tsp serrano pepper, seeded and minced
  • 1 clove garlic, minced or rubbed on the mixing apparatus (see Notes)
  • 1 -2 tbsp chopped fresh basil

Slice the avocados in half lengthwise and twist apart, removing the seeds. Scoop out insides with a spoon and mash the avocado coarsely with a fork. Add salt in 1/8 tsp increments until there’s a balance of bite and richness (usually I end up adding about 1/2 to 1 tsp total, depending on the size of the avocados).

Add the juice of one lime – if it’s a super juicy lime, maybe just use half; if it’s a dryer lime, maybe use up to two. You’re going to have to taste and see; the result should be tangy but not sour.

Stir in the onion, pepper and garlic, if applicable (again, see Notes). Add the basil last and serve immediately.

Notes

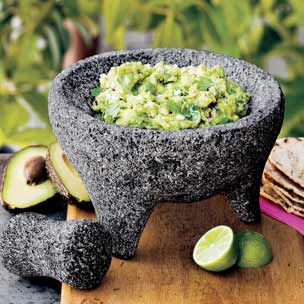
Regarding the garlic. We usually make guacamole in a molcajete, a sort of mortar and pestle-like  kitchen tool used in Mexican cooking. When making guac with a molcajete, we rub one peeled clove all over the bowl of it, and that infuses the guac with flavor while mixing, such that additional garlic isn’t necessary. If you’re not using a molcajete, just add minced garlic towards the end. Delicious either way.

Steamed Artichokes with Balsamic Mayo Dip (Vegan)

Yes, balsamic vegan mayo. Vegan mayo is one of a few wonderful dairy substitute products that make it possible for me to serve rich and creamy things without having to resort to extreme measures, like whipping my own tofu. I love vegan mayo, and I love the fact that it allows me to enjoy a balsamic mayonnaise dip with my artichoke that I would probably not enjoy as much if it were real mayo. Because let’s face it; no matter how much you love mayo, when confronted with it face to face, it looks kind of … oogy. The truth is that people enjoy mayonnaise the most when they don’t have to look at it.

With the balsamic mayo dip for artichokes, however, you do have to look at it, so it’s a good thing this one is vegan and not so sketchy-looking. In my case, I use Vegenaise brand fake mayo, however there are other varieties available, the most common being Nayonaise. Regardless of which brand you prefer, however, either will do the trick. Also, you always have the option of using real mayonnaise, and I’m sure it would be delicious. Though you may want to avert your eyes. 😉

One more thing before I begin – you will need a steamer for this. If you don’t have one, I urge you to buy one soon – they make it so much easier to cook so many things. Oh, the vegetables you’ll steam!

Oh, and I lied, there is actually one more last thing. This is not my original recipe, just a veggie version of another recipe I found. I’ve added a bit more direction and some vegan modifications.

Sssssssteam heat!

Essential kitchen accoutrement

Steamed Artichokes with Balsamic Mayo Dip

  • 2 artichokes
  • 2 lemon slices
  • 2 bay leaves
  • 2 cloves garlic, smashed
  • 1/4 c. vegan mayo or mayo
  • 1 – 2 tbsp balsamic vinegar (to taste)

For this recipe, it’s best to work with artichokes whose leaves have popped a bit; the really tightly closed ones are harder to clean and trim.

Rinse the artichokes under cool running water thoroughly, being careful to clean out any debris that may have gotten lodged down into the leaves. Cut off the rough end of the stem, being sure to leave about 1 – 3 inches of stem (the stems are super tasty!). Depending on which type of artichoke you have, you may wish to trim the tips off the leaves. This is mostly cosmetic, as you won’t be eating the tips, but for some of the spinier varieties, it may be worthwhile to minimize your own pricked fingers. To trim the leaves, just grab one, position your scissors and snip the tip. Simple as that.

Once your artichokes are ready to go, grab a large pot and steamer. Fill the pot with just enough water to touch the bottom of the steamer and add the lemon slices, bay leaves and crushed garlic to the water (under the steamer). They will lend a very subtle flavor to the choke. Place the steamer in the pot and position the artichokes in the steamer. Cover. Bring the water to a boil and reduce to a simmer. Pay attention to the water level while it simmers and make sure it doesn’t get down too low. I usually keep a tea-kettle of water cooking on the stovetop, ready to pour in a bit of water every 5 – 10 minutes or so.

The artichokes will need to steam for 25 – 45 minutes, depending on age, size, how well you keep the water level consistent, etc. When a fork easily pierces through the stem, they’re done. If in doubt, pull off a leaf and taste it. In my opinion, it’s better to have an overcooked artichoke than an undercooked artichoke.

Balsamic Mayo

Whips up in a jiff. Spoon the mayo into a small bowl (eg, a prep bowl or ramekin). Add the balsamic and whip with a fork. You may need to adjust the mayo/balsamic ratio to taste.

Serve alongside our prepared artichokes as a dipping sauce. Mmmmmmmm!

How To Eat an Artichoke

There are 3 tiers or artichoke goodness:

  • The leaves
  • The choke
  • The stem

The leaves and stem I think are self-explanatory, or at least, require minimal explanation. Pull the leaves, dip the bottom if you like, put the leaf in your mouth and drag your teeth across the bottom. Discard. When you get to the stem, just chow down. Yum! But before the stem comes the choke …

As for the choke. There are all those little spiny things. Don’t eat those. You can either scrape the spinies away with your spoon, or slice them off entirely with a knife. I have no strong opinion, except that scraping them is kind of fun. J sure loves it, to be sure. But it takes a bit of a knack, and if you’re impatient, you may want to just cut them out. Once the spinies are gone, feel free to bite right into the heart; it’s the best part of the choke, I think. If that isn’t a metaphor for the ages.

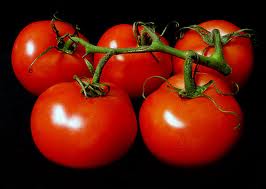
90 Second Tomato Quesadilla (Vegetarian)

vine tomatoes, mmmmmmHi. This a not a shining moment for me, but because you are my very favorite blog readers, I am going to share it with you. As some of you may know, J is gone on tour for the month of May. As some of you may also know, although I am tremendously proud of him and happy that he is such a talented musician he gets to do cool things like tour Europe with Matmos, I am kind of a mess without him. My state of disrepair is not his fault, mind you – it’s mine, just so we’re clear. And he feels really bad about me being sad, so I try not to be too much of a drama queen. But alas, that goes so much against my nature. What can I say, I’m expressive.

Those of you who have seen it before will recognize the telltale signs of my month-long discombobulation. The syndrome is characterized by a number of things I am somewhat embarrassed of, but for which I shan’t apologize, because, well, it ain’t easy being green. The first and most obvious is my instantaneous insomnia (markedly worse than usual). The second is my profound lack of motivation to do anything productive (eg, go jogging, go to the post office, dust, read a book, etc). The third, and most relevant to you, my beloved blog audience, is that I have absolutely no desire to cook anything at all. For starters, J is my taster and second opinion – I feel blind without him. Then there’s the fact that it can be very difficult to cook for only one person – how do you not have way too many leftovers? Then there’s also the fact that one of my big motivators in cooking is the thought, “I want to make something delicious for J because he’s so rad!” So anyway. All of that. Which is why I haven’t developed anything new lately. Except for the 90 Second Tomato Quesadilla, of course.

Which brings me to the not-shining moment I referenced before. Since J’s been gone, I have been eating lots of junk food, including lots of cheese, and even seafood (vegans, please don’t be angry with me!). But some good has come of it. Allow me to introduce the 90 Second Tomato Quesadilla, which has been my dinner staple for more evenings than I’d like to admit. And yes, you really can make it in 90 seconds or less. It’s not hard at all. In fact, it’s so easy, it’s probably kind of silly for me to try to float it by as a “recipe.” Also, I’m sure most, if not all of you, know how to make a quesadilla. But do you know how to make it in 90 seconds or less? Um … anyway, I’m just hoping someone can benefit from my tribulations.

90 Second Tomato Quesadilla

(Makes one-is-the-loneliest-number quesadilla. I recommend doubling the ingredients and making at least two per person. Not just for metaphorical reasons, but because you’ll probably want more than one if you’re using the small tortillas, as recommended.* And naturally, if you’re serving more than one person, multiply accordingly.)

  • 1 half small vine-ripened or heirloom tomato, sliced and the slices halved (Do you have to use vine-ripened or heirloom? Well, it’s up to you, obviously, but I think they are more flavorful than other tomatoes.)
  • 1/4 c. shredded Monterey Jack cheese (Did you know it was spelled with only one “r”? Or that its inventor is disputed? Color me surprised, I always thought it was named for a different Monterrey.)
  • 1 small tortilla (~5 or 6 inch diameter) – I like Whole Foods Red Chile tortillas
  • 1/4 sliced avocado, sprig or two of chopped cilantro and salsa to taste, if desired

If you do this all in an incredibly efficient fashion, I promise you it won’t take longer than 90 seconds; in fact, it will probably only take about a minute. However, if you’re slicing avocado or chopping cilantro, I would anticipate that could potentially add up to a minute or so. And if you’re serving multiple people, then the 90 second thing kind of breaks down. Truly, this is a quesadilla designed for solitude.

Shred about 1/4 c. of Monterey Jack cheese with a grater. Place the tortilla on a microwave safe plate and sprinkle the cheese in a circle in the middle, leaving about 1/2 inch border between the cheese and the edge of the tortilla. Pop it in the microwave for 35 seconds.

Meanwhile, rinse your tomato and cut a few slices. Halve them, and they’re ready to place in your quesadilla. This would also be the time to slice your avo or chop your cilantro (if you hadn’t done so in advance).

When the tortilla with cheese is done in the microwave, place the pieces of tomato in the middle. This is also when you would place the avo and cilantro, if desired.

Fold up like a mini-burrito, and serve immediately. (Don’t dally; they’re not very good cold.)

*If you’re using larger tortillas, adjust the ingredients accordingly.

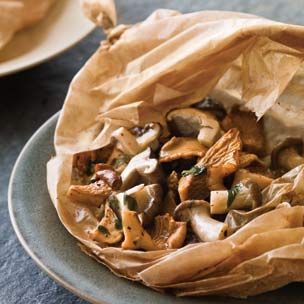
Wild Mushrooms en Papillote (Vegan or Vegetarian)

They're not your father's Freedom Fries

Photo property of Williams-Sonoma

You might have noticed a recurring theme. I’m way batty for mushrooms.

This time I decided to break away from my normal preferred mushroom cooking method and try something different. It’s a slight adaptation of a gem from my home skillet Billy S and certainly an easy way to cook mushrooms if for some reason you find it impractical to saute them on the stove top. The only thing is that I’m not sure if there’s any real advantage to preparing your mushrooms en papillote, other than to sound French, impress Martha Stewart or delight your guests with mushrooms from a paper bag. Some say that this method is healthier because it cuts down on the amount of oil you cook with, but a) you’re replacing it with butter or margarine; and b) cooking mushrooms stove top doesn’t really call for all that much oil. So I don’t know what that’s about. One thing I can say is that cooking your mushrooms this way will result in slightly softer, less browned mushrooms, so if you’re trying to control texture and presentation, that could be a reason to choose the papillote method.

Three important departures from the Billy Sonoma version that I’ve included here: 1) Omitted the parsley because I was serving them in an arugula salad and didn’t need the extra bitterness; 2) After steaming them in the parchment for about 10 minutes, I opened up the bag to dry them out a bit, because they had produced quite a bit of moisture, as we all know our fungus friends are wont to do; 3) Added red pepper flakes, because you know I love the spicy, yo.

One last thing. If you’re wondering where you can get your hands on some parchment, you can find it in most grocery stores in the aisle with aluminum foil and wax paper.

Wild Mushrooms en Papillote

  • 1 tbsp vegan butter or unsalted butter, plus 1 tbsp vegan butter or unsalted butter, cut into small pieces
  • 1 lb mushrooms, brushed clean – I used shiitake, trumpet and almond mushroom (random farmer’s market find), but you could use any combination of mushrooms you like
  • 1/2 tsp ground sea salt
  • 1/4 tsp freshly ground pepper
  • Red pepper flakes, to taste
  • 1 tsp fresh lemon juice

Preheat an oven to 375°F.

Cut parchment paper into an 18-by-11-inch rectangle. Fold the rectangle in half crosswise. Open the parchment and coat with the 1 tbsp butter. Place the rectangle, buttered side up, on a baking sheet.

Cut the mushrooms into bite-size pieces and place in a bowl. Add the salt, pepper, butter pieces, lemon juice and toss well. Spread the mushrooms over one half of the prepared parchment paper. Fold the other half of the parchment rectangle over the mushrooms and fold the vertical edges over twice, working your way along the edge of the paper to end with a twist on both ends. Place the package on a rimmed baking sheet.

Bake until the parchment packet is puffed and the mushrooms are cooked through, about 10 – 12 minutes. At that point, do a progress check – have they thoroughly juiced? If so, go ahead and carefully open up the parchment and return them to the oven for another 1 – 3 minutes to dry out any lingering liquids. Transfer the parchment packet to a platter and serve immediately. (Or, if you’re making a salad, add them to the salad and serve immediately. More on the salad coming soon.)

Sauteed Fiddlehead Ferns (Vegan)

Feed me Seymour

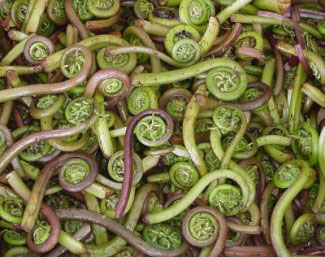
Wild fiddlehead ferns

Remember those fiddlehead ferns I mentioned with my Chik’n Marsala recipe? These are they. Let me tell you a little something about fiddlehead ferns. They’re  magnificent and delicious, and, also, they totally look like aliens. Apparently they’re only available for about three weeks of the year, and mostly in New England, so if you’ve never seen or heard of them, it’s not surprising. I’d never seen or heard of them myself until I saw them through the window of the doorway at Whole Foods one day, and thought “That plant in the window, it’s simply amazing! Oh, while I’m here, I might as well take a hundred dollars worth of roses.”/nerdy Little Shop of Horrors reference

But seriously folks. There are some things people should know about fiddleheads before cooking them, and apparently some of them can cause GI illness if not prepared correctly, though generally speaking they’re safe and delicious. You just need to cook them thoroughly. And not eat them raw.

As far as what they taste like, they’re not very far from asparagus or broccolini, with a super green freshness, slight nuttiness and hint of bitter aftertaste.

By the way, this recipe is not my invention. I found it at Earthly Delights. But I scoured pages and pages of recipes to find ideas for the perfect simple treatment, and it wasn’t easy to find, so I wanted to make it easy for you.

Sauteed Fiddlehead Ferns

  • 1 lb fresh fiddlehead ferns, tightly closed
  • 2 quarts boiling water
  • 1 tsp freshly ground sea salt
  • Ice water
  • 4 tbsp vegan butter or margarine (or you could use regular butter for a vegetarian version)
  • 1 tbsp fresh lemon juice
  • 1/2 teaspoon freshly ground pepper

Clean and trim the fiddleheads, snipping off the tough stems or any brown unsightly parts. Rinse in cold water – you may need to go through a few rounds of cold water until it’s clear. Meanwhile, boil two quarts of salted water and have a bowl of ice water on hand.

When the water is boiling, add the fiddleheads. Return to a boil and cook for only about two or three minutes, timing it carefully. Strain the boiling water and dunk the ferns immediately in ice water. Drain the fiddleheads and pat them dry.

Meanwhile, in a large skillet over medium heat, melt the butter. As it begins to bubble, add the blanched fiddleheads. Sauté for about two minutes, then add the lemon juice and stir thoroughly. Season with salt and pepper and remove from heat. Serve immediately.

Zucchini Relleno with Lentils (Vegan)

Calabacines rellenos con lentejas

There I was minding my own quiet business waiting for my delicious burrito-to-go from Humberto’s, when lo-and-behold I spied to my right a little Spanish-language classified news rag that had “RECETAS! p. 38” in bold on the side. And I was like, RECETAS! OMG! There’s nothing I love more than recetas, because if it’s a recipe, and it’s in San Diego, and it’s in Spanish, there’s a 90% certainty it will be fantastic. Even if it was sponsored by Nestle. Which it was.

And that being the case, and deliciousness of the recipe aside, I question whether the person who wrote it out ever actually made it, because a lot of the directions were totally wonky. If I had naively followed them, the outcome would have been disastrous. Fortunately, I *slightly* knew what I was doing, and I feel confident that you can trust this version, although I have included a few notes throughout. But don’t worry. Even if you’re not an adventurous cook (and there’s nothing wrong with that – life is too short for bad food), you can’t go wrong with this one.

For the record, I’ve made no explicitly vegetarian/vegan modifications to this recipe, as its original purpose was to serve the Spanish-speaking community with vegetarian recipes for options during Lent. The modifications I’ve made were strictly of the “it is better to make it this way” variety.

Zucchini Stuffed with Lentils

  • 6 zucchini, cut in half lengthwise, stems cut off, scooped of pulp & seeds
  • 3 – 4 tbsp vegetable oil (divided use)
  • 1 medium white onion, diced
  • 1 – 2 serrano peppers, de-seeded and minced
  • 3 large cloves garlic, minced
  • 1 1/2 cups lentils
  • 10 oz tomato sauce
  • 2 tbsp Maggi seasoning sauce (you can find it near steak sauces or in the Mexican food isle or at Mexican food markets; if you can’t find it, soy sauce would work – though Maggi has this strange aromatic-ness that is better)
  • Diced cilantro for garnish, to taste
  • Dry loose cotija for garnish, if desired (of course this will render it no longer vegan)

Slice and de-seed/de-pulp 6 zucchini in preparation. I recommend a spoon for the de-pulping. Additionally, please note that each halved zucchini is about 1 side serving, and once they are cooked they don’t keep well. Hence, if you are cooking for a small bunch I would recommend only preparing the number of zucchini halves you expect to eat. For instance, J and I would only prepare 2 zucchinis, for a total of 4 halves. We’d save the remaining lentil mixture and prepare the zucchinis on an as-needed basis. Does that make sense? Am I over-complicating things? I can do that sometimes. Anyhoo, back to the recipe.

Follow the instructions on the package to cook the lentils (usually ~ 20 minutes/2 cups lentils). If you bought bulk lentils, here’s a quick explanation of how to prepare them.

For the mixture:

Heat 1 tbsp of the veg oil in a large pan on medium heat. Add the onion, garlic and pepper and cook, stirring frequently, until onion is soft. Add the cooked lentils, tomato sauce and Maggi sauce and cook, stirring frequently for about 2 minutes, until everything is hot. Remove from heat. Fill the zucchini halves uniformly with the lentil mixture. Now, you have two final options:

If you want to cook the stuffed zucchini stovetop:

Add the remaining 2 – 3 tbsp of oil to the original pan and heat on medium-low. Place the zucchini in the pan and heat for about 10 minutes or until tender.

If you want to bake the stuffed zucchini in the oven:

Preheat the oven to 350 degrees. Bake the stuffed zucchini on a baking sheet or in an iron skillet for about 10 minutes, or until tender. This option is healthier as it requires no oil, but it may result in dryer zucchinis.

Serve immediately with salsa,* cilantro and optional cotija as a garnish. When removing the zucchinis from the pan to serve, use a spatula to avoid a crumpled zucchini fiasco.

A NOTE ABOUT THIS RECIPE: I really liked my first attempt at this but felt there were many improvements that could be made. I will continue to experiment with it and promise to provide updates in the future. Please check back!

*If you’re in San Diego in the greater park area, head over to JayCee’s on 25th & C – they have this excellent fresh homemade salsa in the back of the store in the refrigerated section near the meat counter by the Oaxacan queso. We like the hot version, but all of the varieties are excellent.

Mushroom Quesadillas (Vegetarian)

Hongos y queso, que guay

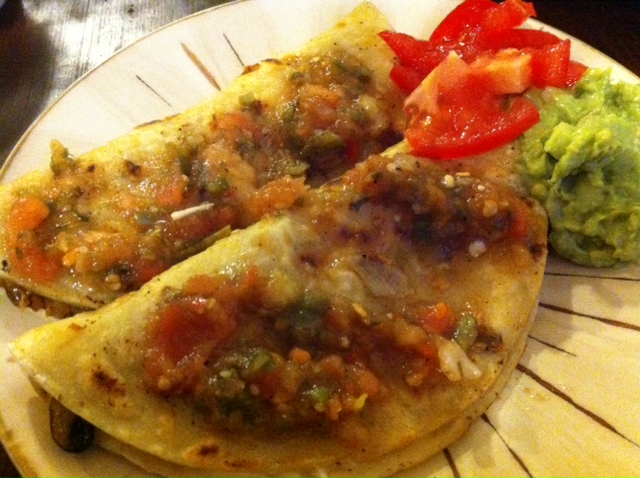
Mushroom quesadillas topped with salsa, tomato and guacamole

Oh, I stole this from Rick Bayless, Mexican food chef extraordinaire. Though I suppose I didn’t really steal it, since I paid for his book and all. And I haven’t changed anything about it, so perhaps this is plagiaraism, but … well, I’m here to just help you find good vegetarian recipes that you can trust, so I don’t worry about semantics like that. Rick Bayless, please don’t hate me for sharing:

  • 1 lb mushrooms (preferably button, baby bella, shitaake or some flavorful variety – though white will also do), sliced in ~ 1/4 inch slices
  • Smallish corn tortillas
  • Olive oil
  • 2 – 3 serrano peppers, de-seeded and minced
  • 1/4 c. chopped cilantro
  • 1/4 – 1/2 tsp salt
  • 1/2 c. grated Monterey Jack cheese

So, get all the ingredients to the state they’re supposed to be. In a large skillet, heat about 2 tbsp oil on medium heat and add the mushrooms and pepper. Toss in oil and cook lightly for a minute or so. Cover and cook for 4 -5 minutes, stirring every minute or so, until the mushrooms let out a lot of juice. Once they’ve juiced, remove cover and continue to simmer briskly until most of the juice has evaporated, another 2 minutes or so. Add the salt and cilantro at this stage, continuing to stir and cook until the cilantro is wilted, and tasting to determine appropriate amounts.

When you’re satisfied with the mushrooms, remove from heat and set aside.

Preheat your oven on the lowest possible setting with a casserole dish or baking sheet inside – when quesadillas are done, you can place them inside to keep them warm while you are waiting to cook them all before serving.

Meanwhile, heat a skillet on medium-high. With a basting brush or something to that effect, cover one side of a tortilla with olive oil. Place the tortilla, oil side down, in the middle of the pan. Sprinkle a small amount of grated cheese on the tortilla, leaving approximately 1/2 inch border. Spoon about 1 – 2 tsp mushroom mix into the middle of the tortilla and cook until cheese is melted. Fold tortilla over and cook on each side, flipping over every minute or so until crispy on both sides.

When each quesadilla is done, scoop it out with a spatula and move to the heated dish or baking sheet in the oven to keep warm until ready to serve.

Serve with salsa and guacamole and/or whatever you like.

Chanterelles & Fresh Corn (Vegan or Vegetarian)

tasty

Not my own pic, but close enough

Totally ganked this recipe from the LA Times. But no specific chef or author was credited, so my props can’t go further than that. The addition of the gruyère was my own innovation, albeit a modest one. Also, if you use the gruyère, obviously it’s not vegan anymore, and furthermore it wouldn’t technically be vegetarian either, because gruyère usually contains rennet. But, since gruyère is so delicious, it’s one of those occasional rule benders we’re known to eat. Whatever—this dish is rich and luscious with or without the gruyère. Also, it’s super fast & simple to make.

  • ~4 – 8 oz chanterelles
  • ~4 cobs fresh sweet corn
  • 2 tbsp walnut oil (if you don’t have walnut oil, olive oil will suffice)
  • ~ 1 tsp sea salt
  • Bit o’ water or homemade veggie stock (extra credit for mushroom stock, if the latter, however, be mindful that whatever stock you use isn’t too strong, as this dish has subtle flavors that could be overpowered by too bold of a stock)
  • ~1/3 cup shredded gruyère, if desired

Dust the chanterelles clean with a mushroom brush and slice them in whatever way makes most sense to you, but not too big, small or thin.

Cut the corn from the cobs – it’s not difficult but it does take some getting used to. Here’s what I do: Remove the husks & cornsilk. Take the cob, stand it on its flat end in a dish deep enough to prevent the corn kernels from flying all over the place. Take a sharp knife and slice in four sweeps, 3 or 4 or so rows of kernels at a time, creating a cube around the cob. Does that make sense? If not, please view this tutorial for a visual representation.

Heat the oil. Throw the mushrooms, corn & salt into the pan, stir and saute for about 2 minutes. Add the veggie stock (or water) and cover, stirring occasionally. Let cook around 8 minutes, until corn is tender. Uncover the pan and continue to cook until liquid is mostly evaporated. Salt & pepper to taste, and serve with shredded gruyere (if desired).