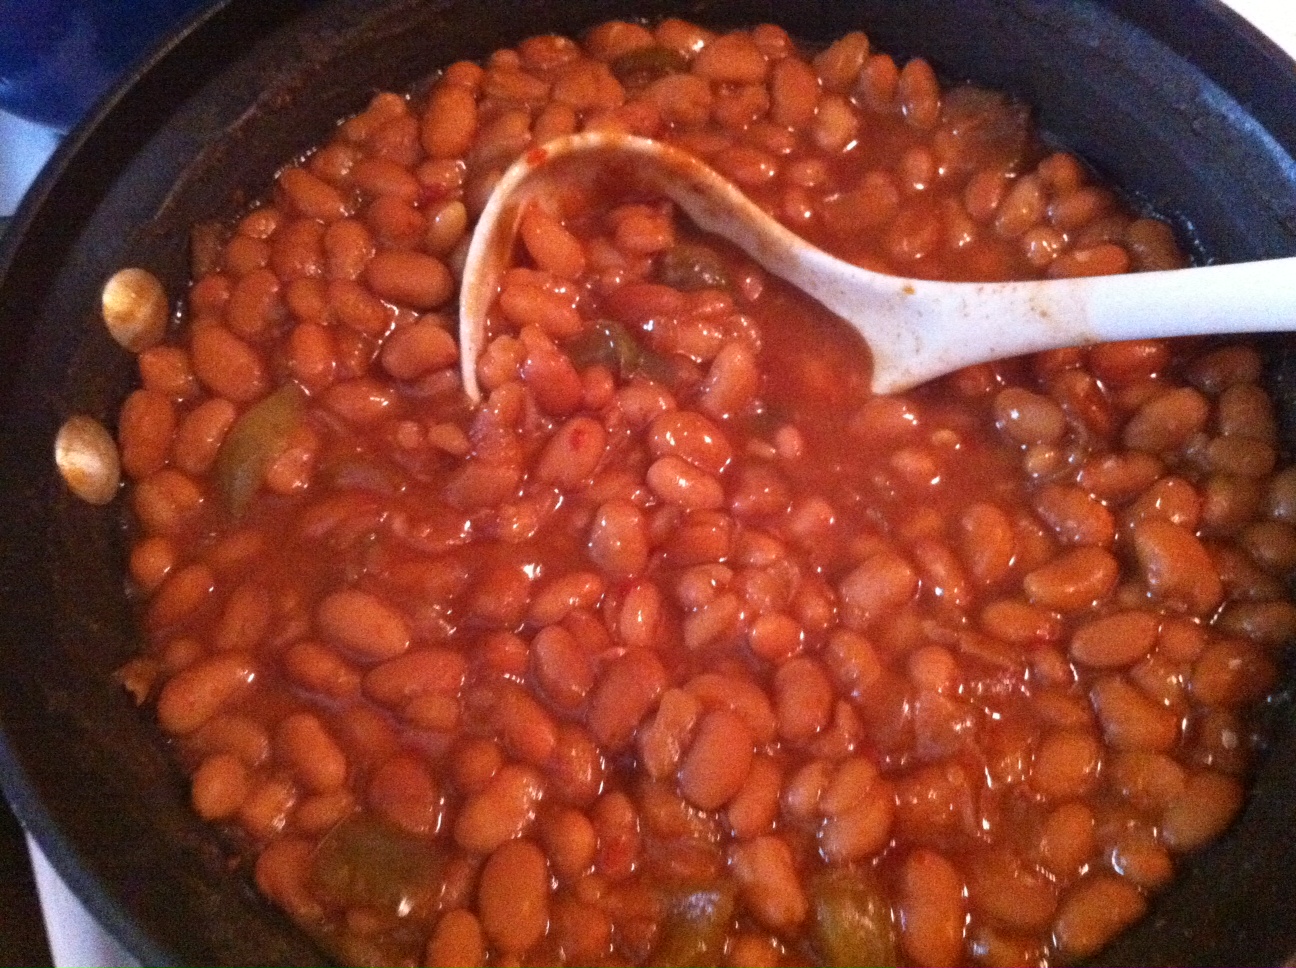
Phyllis’ Old-Fashioned Baked Beans (Vegan or Vegetarian)
“If there’s a secret to any of the few dishes I can create, it’s simplicity. And sugar, you can never go wrong with sugar.” – Phyllis (my mother)

Sage words, indeed. Phyllis said this in response to my fanatical raving about how awesome my baked beans turned out after I used her recipe for a 4th of July party and asked her where the heck she got it from. It is a dish that she has distilled to perfection over several decades of experimentation, based on a – yes, seriously – Betty Crocker original from a cookbook that she was given as a wedding gift in the 60s. Anyway, don’t let its humble origin fool you. These beans are fantastic and if you serve them at a party, they will disappear in short order.

A word about baked beans in general. They are a Midwestern potluck and bbq staple, and as such, we must make certain allowances for their unique strategy for tastiness. I am often a little hesitant and bashful to share the ingredients of some Sweet Home recipes of mine, because people are sometimes shocked at their … pragmatism, to put it delicately. In more candid terms, what I mean is that on the West coast I think people usually assume anything delicious comes from fresh, organic, farm-raised, sustainably produced, obscure and esoteric ingredients. Not always so back at Sweet Home. See, there’s this magic, versatile substance that is a mainstay of countless classics, which can be substituted for any number of more expensive, time-consuming and unpredictable ingredients … trust me, you’d be amazed. The mystery food in question. Is.

Catsup. There, I said it.

Now, before you judge me for using catsup instead of something more bohemian (not that you would, I’m just projecting), please consider for a moment the controversial cultural origin of America’s favorite condiment. For instance, it’s been theorized that modern catsup has origins as distant and arcane as 16th century Chinese tomato and fish sauces, or possibly similar time period Indonesian, Thai or Phillipino concoctions, or even possibly 17th century European adaptations of an Arabian pickling sauce, which evolved from the Arabic term “kabeees,” anglicized to “caveach,” the term for something you might know as “escabeche.” The thing is, food and language historians can’t agree. So instead of thinking of catsup as something commonplace and American, let’s appreciate it’s exotic and mysterious properties. And further, with these potential Asian/Indo/Euro origins in mind, I’d like to postulate a theory about the genealogy of old-fashioned “American” baked beans as we now know them, and suggest that perhaps they’re not too distantly related to the beloved Indian dish known as chana masala? Think about it – the white beans, the sweet and sour sauce, the hint of spiciness? Anyway, this is how I like to think about them. Don’t talk to me about English breakfasts or Boston beans. Chana masala is my story and I’m sticking to it. The end.

So without any further ado …

Phyllis’ Old-Fashioned Baked Beans

  • 1 large green bell pepper, diced
  • 1 large white onion, diced
  • 1 – 2 jalapeños, minced
  • 2 – 3 cloves garlic, minced
  • Dash of cayenne
  • 6 cans navy beans (cannelinis could work too)
  • Ketchup to taste (~2 tbsp
  • Brown sugar to taste (~1 cup)
  • Salt to taste
  • 5 tbsp olive oil or butter to be used in phases (if you choose butter that renders it unvegan, obvi)

Preheat oven to 300.

Heat a large skillet on medium. When the skillet is hot, add 2 tbsp olive oil or butter. When the oil or butter is hot, add the onions, pepper and garlic, and saute until softened. Salt to taste and stir in a dash of cayenne, to taste. Set aside to combine with the beans later.

To prepare the beans for baking, in the words of Phyllis:

“I use a rectangular cake pan but it doesn’t matter. Layer 1 to 2 inches of beans, sprinkle brown sugar generously over beans.* Continue layering until you reach the amount you want. At the top, instead of brown sugar, layer catsup . Doesn’t matter how much. I’m not crazy about catsup so I don’t use lot. Bake around 300 for about 45 min or until the catsup on top is thickened and beans are hot. Salt if preferred.”

*At this juncture I should point out a couple of departures I made from Phyllis’ method. For one, when I was layering the beans and brown sugar, I also dropped in small pats of butter for each layer. When I talked to her live she told me that sometimes she does it. You could also drizzle a tiny amount of oil or vegan butter instead. This is not mandatory but does add a creamy, rich flavor.

Also, the vegetables are my own embellishment. They are not standard but intended to make up for the fact that she usually makes them with ham or bacon or both, so I wanted to add flavor to compensate for the absence of pork.

Anyhoo, after you follow Phyllis’ method of preparing the beans, when they are five minutes from fully baked, pull them out of the oven and stir in the sauteed vegetable mixture. If you like, drizzle a bit more catsup on top and then bake for another 5 minutes or so. Serve hot.

Spicy Baked Eggs (Vegetarian)

First of all, I invite you to follow me on Twitter @zdoerck for my 140 character version of this recipe and more to come. For those of you who are seeing this on Facebook, apologies for the redundancy.

This is an adaptation of a Pakistani recipe from The Spice Spoon (bonus: contains charming nostalgic reflection upon author’s childhood experience). My modifications include doubling the onion, adding garlic, cayenne and red chili flakes, and cooking stovetop instead of baking. You certainly can bake it if you prefer, but I find the eggs cook more uniformly on the stove, and it is also easier to avoid over-cooking them. You could also use any form of chili you like – a bit of minced jalapeño or serrano would be lovely in place of the dry chili seasonings.

Spicy Baked Eggs

  • 4 cage-free organic eggs
  • 2 tbsp olive or grapeseed oil
  • 4 medium tomatoes, blanched, peeled and diced
  • ½ onion
  • Pinch turmeric
  • Pinch cayenne
  • 1 – 2 cloves garlic
  • Red chili flakes to taste
  • Salt and pepper to taste
  • Chopped cilantro for garnish

Blanch tomatoes for one or two minutes. When skins begin to break, plunge into cold water to stop the cooking. Peel off the skins and dice the tomatoes.

Heat oil on medium heat in medium sized skillet. When the oil is hot, add the onion and sauté until translucent. Stir in the tomato and spices and cook, stirring frequently, for about 5 – 7 minutes.

Place the raw eggs on top of the tomato mixture. To ensure no broken yolks or eggshell, I would recommend cracking each egg into a small bowl and carefully placing them on the mixture one at a time. Incidentally, did you know that some chefs recommend cracking your egg on a hard, flat surface rather than an edge, to ensure more even cracking? I’ve tried it and it does seem to yield better results …

Once the eggs are in place, cover and leave them to cook. Check back in about 12 to 15 minutes – if you prefer runny yolks, 15 to 17 minutes is probably all you need; for more solid yolks, you may need about 20 minutes.

Garnish with cilantro and serve immediately with naan or pita.

Little Green Hot Peppers from Padrón (Vegan)

As the malaprop goes, “Ones are spicy, anothers don’t.” Indeed.

Ones are spicy, anothers don’t.

The little green hot peppers in question are known as “Pimientos de Padrón” and originally hail from the state of Galicia in Northern Spain. I first learned about said peppers while living in Santiago de Compostela several years ago. I can’t speak for the rest of Spain, but I do know you can’t spend much time in Santiago before you notice that every 10th tourist is sporting a t-shirt proclaiming the celebrity of the tasty peppers in a delightfully awkward translation from the Castilian Spanish, “LITTLE GREEN HOT PEPPERS FROM PADRÓN, ONES ARE SPICY, ANOTHERS DON’T” (pictured at right).

In Castilian Spanish, the proverb actually goes “Algunos te pican, otros no,” for which the direct translation is “Some sting you, others do not.” Which clearly doesn’t translate well to English either. Essentially, this particular saying just highlights the disparity between how Spanish and English treat indefinite pronouns, not to mention how we express spiciness – as a state versus as an action. Personally, I like to think of spiciness as an action, and I think the mistranslation captures the truth of the matter more concisely and appropriately in its inobeisance of grammar constructs. My kitchen is free from the tyranny of language rules.

Anyway. These little green hot peppers are so ubiquitous in Galicia that it’s hard to even have one drink at a bar without someone serving you a few as a free tapa. I do not exaggerate. They’re so everywhere all the time that people are giving them away for free. Which is how I quickly came to learn to prepare them myself. And the truth is, they are super easy to make as a quick appetizer or snack at home. The hardest part (in San Diego, anyway) is getting your hands on some of them. They sometimes have them at Whole Foods or other grocery stores. We usually get them from  Suzie’s Farm at our nearby Farmer’s Market. You could also join their CSA and presumably have access to peppers of Padrón whenever they’re in season, as well as plenty of other awesome vegetables.

Pimientos de Padrón

  • 1/2 lb peppers of Padrón
  • 4 tbsp olive oil
  • Lots of salt

I was taught this method of preparing peppers of Padrón by a lifelong resident of Galicia. He basically said to me, “Heat a lot of oil in a pan. When it is hot, throw in the peppers. The oil will splatter. Ignore it. Well, don’t burn yourself on it, just don’t be stupid. Afterwards, stir in an amount of salt which is far more than you think you should, and after you’ve done that, add even more. You will probably never put enough salt in, because you will think nothing should have that much salt. But you will be wrong.”

It’s true. Every time I’ve made these, I’ve thought I put an insane amount of salt in, and afterwards I’ve thought, “Gosh, that really could have used more salt.” Though they’re still delicious anyway.

So, fry them in salt, stirring frequently, until the peppers are blistered and browned. Serve hot, but not too hot (don’t want to bite into boiling oil, you know).

And by the way, beware. Some of them are spicy and others aren’t.

Zucchini Relleno with Lentils (Vegan)

Calabacines rellenos con lentejas

There I was minding my own quiet business waiting for my delicious burrito-to-go from Humberto’s, when lo-and-behold I spied to my right a little Spanish-language classified news rag that had “RECETAS! p. 38” in bold on the side. And I was like, RECETAS! OMG! There’s nothing I love more than recetas, because if it’s a recipe, and it’s in San Diego, and it’s in Spanish, there’s a 90% certainty it will be fantastic. Even if it was sponsored by Nestle. Which it was.

And that being the case, and deliciousness of the recipe aside, I question whether the person who wrote it out ever actually made it, because a lot of the directions were totally wonky. If I had naively followed them, the outcome would have been disastrous. Fortunately, I *slightly* knew what I was doing, and I feel confident that you can trust this version, although I have included a few notes throughout. But don’t worry. Even if you’re not an adventurous cook (and there’s nothing wrong with that – life is too short for bad food), you can’t go wrong with this one.

For the record, I’ve made no explicitly vegetarian/vegan modifications to this recipe, as its original purpose was to serve the Spanish-speaking community with vegetarian recipes for options during Lent. The modifications I’ve made were strictly of the “it is better to make it this way” variety.

Zucchini Stuffed with Lentils

  • 6 zucchini, cut in half lengthwise, stems cut off, scooped of pulp & seeds
  • 3 – 4 tbsp vegetable oil (divided use)
  • 1 medium white onion, diced
  • 1 – 2 serrano peppers, de-seeded and minced
  • 3 large cloves garlic, minced
  • 1 1/2 cups lentils
  • 10 oz tomato sauce
  • 2 tbsp Maggi seasoning sauce (you can find it near steak sauces or in the Mexican food isle or at Mexican food markets; if you can’t find it, soy sauce would work – though Maggi has this strange aromatic-ness that is better)
  • Diced cilantro for garnish, to taste
  • Dry loose cotija for garnish, if desired (of course this will render it no longer vegan)

Slice and de-seed/de-pulp 6 zucchini in preparation. I recommend a spoon for the de-pulping. Additionally, please note that each halved zucchini is about 1 side serving, and once they are cooked they don’t keep well. Hence, if you are cooking for a small bunch I would recommend only preparing the number of zucchini halves you expect to eat. For instance, J and I would only prepare 2 zucchinis, for a total of 4 halves. We’d save the remaining lentil mixture and prepare the zucchinis on an as-needed basis. Does that make sense? Am I over-complicating things? I can do that sometimes. Anyhoo, back to the recipe.

Follow the instructions on the package to cook the lentils (usually ~ 20 minutes/2 cups lentils). If you bought bulk lentils, here’s a quick explanation of how to prepare them.

For the mixture:

Heat 1 tbsp of the veg oil in a large pan on medium heat. Add the onion, garlic and pepper and cook, stirring frequently, until onion is soft. Add the cooked lentils, tomato sauce and Maggi sauce and cook, stirring frequently for about 2 minutes, until everything is hot. Remove from heat. Fill the zucchini halves uniformly with the lentil mixture. Now, you have two final options:

If you want to cook the stuffed zucchini stovetop:

Add the remaining 2 – 3 tbsp of oil to the original pan and heat on medium-low. Place the zucchini in the pan and heat for about 10 minutes or until tender.

If you want to bake the stuffed zucchini in the oven:

Preheat the oven to 350 degrees. Bake the stuffed zucchini on a baking sheet or in an iron skillet for about 10 minutes, or until tender. This option is healthier as it requires no oil, but it may result in dryer zucchinis.

Serve immediately with salsa,* cilantro and optional cotija as a garnish. When removing the zucchinis from the pan to serve, use a spatula to avoid a crumpled zucchini fiasco.

A NOTE ABOUT THIS RECIPE: I really liked my first attempt at this but felt there were many improvements that could be made. I will continue to experiment with it and promise to provide updates in the future. Please check back!

*If you’re in San Diego in the greater park area, head over to JayCee’s on 25th & C – they have this excellent fresh homemade salsa in the back of the store in the refrigerated section near the meat counter by the Oaxacan queso. We like the hot version, but all of the varieties are excellent.

Mushroom Quesadillas (Vegetarian)

Hongos y queso, que guay

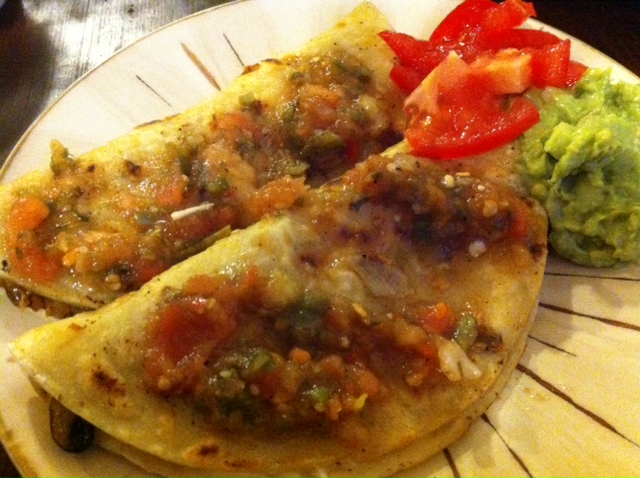
Mushroom quesadillas topped with salsa, tomato and guacamole

Oh, I stole this from Rick Bayless, Mexican food chef extraordinaire. Though I suppose I didn’t really steal it, since I paid for his book and all. And I haven’t changed anything about it, so perhaps this is plagiaraism, but … well, I’m here to just help you find good vegetarian recipes that you can trust, so I don’t worry about semantics like that. Rick Bayless, please don’t hate me for sharing:

  • 1 lb mushrooms (preferably button, baby bella, shitaake or some flavorful variety – though white will also do), sliced in ~ 1/4 inch slices
  • Smallish corn tortillas
  • Olive oil
  • 2 – 3 serrano peppers, de-seeded and minced
  • 1/4 c. chopped cilantro
  • 1/4 – 1/2 tsp salt
  • 1/2 c. grated Monterey Jack cheese

So, get all the ingredients to the state they’re supposed to be. In a large skillet, heat about 2 tbsp oil on medium heat and add the mushrooms and pepper. Toss in oil and cook lightly for a minute or so. Cover and cook for 4 -5 minutes, stirring every minute or so, until the mushrooms let out a lot of juice. Once they’ve juiced, remove cover and continue to simmer briskly until most of the juice has evaporated, another 2 minutes or so. Add the salt and cilantro at this stage, continuing to stir and cook until the cilantro is wilted, and tasting to determine appropriate amounts.

When you’re satisfied with the mushrooms, remove from heat and set aside.

Preheat your oven on the lowest possible setting with a casserole dish or baking sheet inside – when quesadillas are done, you can place them inside to keep them warm while you are waiting to cook them all before serving.

Meanwhile, heat a skillet on medium-high. With a basting brush or something to that effect, cover one side of a tortilla with olive oil. Place the tortilla, oil side down, in the middle of the pan. Sprinkle a small amount of grated cheese on the tortilla, leaving approximately 1/2 inch border. Spoon about 1 – 2 tsp mushroom mix into the middle of the tortilla and cook until cheese is melted. Fold tortilla over and cook on each side, flipping over every minute or so until crispy on both sides.

When each quesadilla is done, scoop it out with a spatula and move to the heated dish or baking sheet in the oven to keep warm until ready to serve.

Serve with salsa and guacamole and/or whatever you like.

Z’s Spicy Corn Chowder (Vegan)

This party fave is the result of a combination of several different white bean chili recipes, actually, all originally meat-inclusive, minus the beans and plus a bunch of random stuff I added for fun, including a few special twists I like to include to make something mine (e.g., hella garlic, jalapeno, potatoes and homemade soup stock) alongside the requisite vegification. Enjoy!

By the way, please note: This is a fairly spicy chowder. If you have trouble with spicy things, I’d recommend starting with about 1/4 of the recommended jalapeño & cayenne, and then adding additional pepper to taste. Don’t say I didn’t warn you. However, if you luvah the spicy, preparing this with the maximum amount of pepper ingredients recommended puts it at about a 7 on a 1 to 10 spicy scale, IMO. So …

  • 2 large onions, diced
  • 2 large carrots, diced or thinly sliced
  • 1 celery rib, chopped (3/4 cup)
  • 2 bell peppers, red or yellow or both, chopped or diced
  • 4 – 6 smallish sized potatoes, peeled and cut into 1/4-inch pieces (I use Yukon gold or red or both, though you can really use any kind of potato, and you can use more or less if you like)
  • 2 fresh thyme sprigs, chopped
  • 3 c. sweet corn (from about 4 ears)
  • Enough olive oil to sauté the veggies (~3 tbsp or so)
  • 4-5 large cloves garlic, minced
  • 1 or 2 jalapeños, de-seeded & minced (don’t rub your eyes!)
  • 4 c. vegetable broth (make your own, it’s easy!)
  • 1 c. water
  • 2 tbsp vegan cream cheese (or more, based on your preference)
  • Dry thyme*
  • Cayenne*
  • Freshly ground sea salt*
  • Freshly ground black pepper*
  • Ground cloves or nutmeg*

If you’ve never cut fresh corn from the cob, view this tutorial. If you are intimidated, however, please feel free to use canned or frozen corn. It won’t have quite the same freshness, but it will still be delicious, so don’t you worry. Anyhoo …

In a large pan, sear the corn for a few minutes, until it begins to brown slightly. Set aside.

Heat olive oil in a Dutch oven (or big stock pot) on medium to medium high heat.

Saute the garlic, onion, peppers, celery until soft, about 5-7 minutes. Add water, vegetable broth, carrot, potato, fresh thyme & cayenne and bring to a simmer. Allow to cook for 20 – 25 minutes.

Stir in the cream cheese & corn, gently whisking until well combined. Allow to cook for another 10 – 20 minutes or so. Add the salt, pepper, dried thyme & nutmeg. You can also add more cayenne & more cream cheese to taste, if desired.

Notes

A very loose & general guide to spice quantities:

  • Around a small handful of salt & pepper
  • More dry thyme than you would expect (6 – 10 shakes of the jar)
  • A few shakes of the clove or nutmeg (around a teaspoon maybe)
  • Around 1 teaspoon of cayenne

J’s Black-Eyed Peas (Vegan)

J says:

The thing to remember here is that thyme is your friend; it takes the part of the ham hock which is usually required in this Southern dish. I’ve listed dried thyme, but HIGHLY suggest getting it fresh. It’s easy to grow yourself to have on hand. Around our house, we normally include a jalapeño, slit four times down the sides, so that I can remove it after cooking. If you aren’t sure about your spice tolerance, cook with only a little pepper and finish with Tabasco or another pepper sauce on your plate. It is easy to reduce the amount of sodium by using less vegetable broth. I’ve made it with water instead and extra thyme and it works out great.

  • 16 oz black-eyed peas
  • 5 c. veggie broth
  • 1 c. chopped onion
  • 1 carrot, peeled and diced
  • 4 cloves garlic, smashed and minced
  • 1/2 tsp dried red pepper flakes
  • 1/2 tsp freshly ground black pepper
  • 2 tsp dried leaf thyme (~2 tbsp chopped, if fresh)
  • 1/4 tsp dried leaf oregano
  • Tabasco or pepper sauce, to taste
  • Salt to taste

Rinse peas and pick over for bad or discolored peas and small stones; transfer to a large saucepan or Dutch oven. Cover with broth and bring to a boil. Reduce heat to a simmer and continue cooking for 5 minutes. Add the onion, diced carrot and garlic.

Add  enough water to cover by 2 inches. Add pepper flakes, black pepper, thyme and oregano. Bring to a boil; reduce heat to medium and simmer, covered, for about an hour. Uncover and cook for 30 – 45 minutes longer (this is a good time to start some rice), or until peas are tender. Add more water as needed to keep them moist.

Serve with brown rice and steamed collard greens with lemon.

And because J is such a great guy, he’s included nutritional info for you:

1 cup = 143 calories
Protein        9g
Carbs        24.7g
Sugar        4.5g
Fiber        7.5g
Fat            .6g
Cholesterol    0mg
Sodium        Varies, depending on salt content of vegetable stock and added salt

Mushroom Spinach Arrabiata (Vegan)

This is a very fast and easy pasta of the variety that I usually make if I haven’t been to the store for a while and/or I’m feeling lazy. That is because I pretty much always have all of the ingredients on hand,* and also because it’s really fast and easy to make. Oh wait, I already said that. Did I mention it’s fast and easy? But how about quick and simple? Anyway. As an aside, if I were dispensing unsolicited advice on general kitchen-keeping, I’d say try to usually have these ingredients on hand. With these basics, there are many different dishes which can easily be thrown together on a moment’s notice.


Mushroom Spinach Arrabiata

  • 1/2 lb mushrooms (I like button or baby bella, but any kind will do)
  • 4 tomatoes, roughly chopped
  • 6 c. uncooked spinach
  • 1/2 onion, diced
  • 2 – 3 cloves garlic, minced
  • 2 tbsp olive oil
  • 1 can stewed tomatoes, chopped, with sauce
  • Oregano (or you could just use a generic Italian seasoning blend – Trader Joe’s has a pretty good version)
  • Red pepper flakes, to taste (I use a lot)
  • Salt & pepper to taste
  • 1/2 package of pasta (follow cooking directions)

Saute mushrooms on medium heat for a couple minutes, then covered for a few minutes more until they juice. Remove cover and continue to cook until liquid is reabsorbed. Add garlic and onion and saute until onion is softened.** Add tomatoes and spinach and cook until spinach is fully wilted and tomatoes are mushy. Add stewed tomatoes and seasonings to taste. Continue to cook until the sauce is thick and pasta is done.

Serve immediately with pasta. Makes  approximately 4 servings.

*You can omit any of the fresh vegetables if you don’t have them.

**J prefers this sauce to be pureed with the onions and fresh tomatoes for a smoother sauce. If that is your preference too, then simply start by sauteing the onions & garlic before the mushrooms, add the tomatoes and tomato sauce, then blend in a food processor until smooth. Saute the mushrooms separately per my directions above, add the spinach and saute until it wilts, then add the pureed sauce to the mixture and cook until it’s hot.