Morels Reloaded: This Time It’s Personal (Vegan)
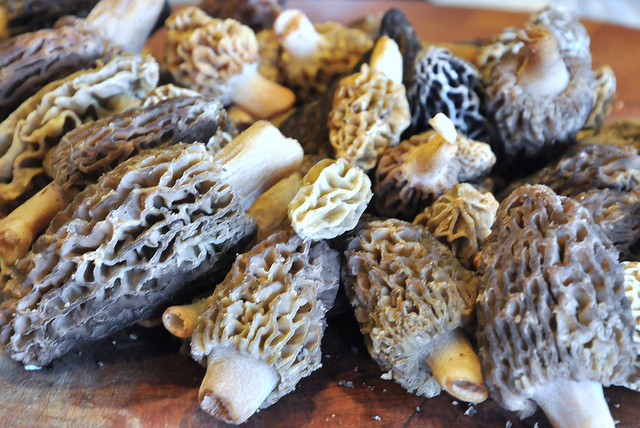
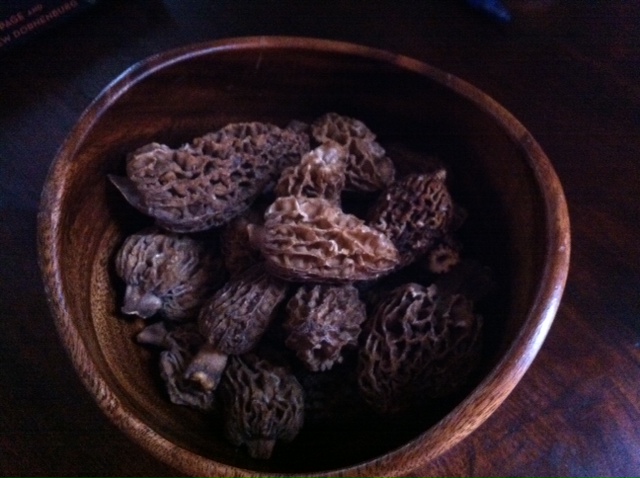
Damnit morels, you shall bend to my will! This was my thought when I rounded the corner at the grocery store the other day and spied my old nemeses lying nonchalantly among the shitakes and bellas. In spite of my terrible first experience with morels, or maybe because of it, I was suddenly possessed with an overwhelming desire to conquer them for once and for all. Or at least prove to myself that they suck no matter what I do to them. So I picked out a very small number of the good’uns (after all, I was only cooking for myself, plus this was an experiment, plus they’re super freaking expensive) and made up my mind that in spite of the advice of all the morel connoisseurs, I was going to soak the hell out of these puppies and then torture them to death in the frying pan, because the intolerable grittiness and chewy consistency are what did me in so thoroughly the  last time. Although morel lovers might tell you it’s unnecessary to soak them or that it will compromise their flavor, I’m here to tell you this: The morels I made after soaking them for several hours in salt water vs. the morels I made last month following the advice of the experts to “preserve the flavor” were like night and day. The morel* of the story is, don’t underestimate how much gritty, tripe-like mushrooms can ruin a dish.

This batch, however, made me understand why people are so cuckoo for morels. They are just super rich, meaty, earthy, forest-y, and … je ne sais quoi. I did so very little to them aside from the soaking and the stovetop abuse, yet nevertheless they were delish. So, yeah, I stand corrected, they don’t suck. Though I do still think they’re super creepy-looking. Regardless. You should try them. And in case you were concerned, a word about them being expensive: Yes, you might find them as high as $40/lb. But they are super light and you don’t need very much. 1/4 lb is often all you need for 2 – 3 servings. Which isn’t cheap, but it’s doable.

Here’s whatcha do:

Find a place that sells morels. The only places I’ve ever seen them here are Whole Foods and the farmer’s market. Pick morels that are spongy and light to medium brown, not super dry and not super moist. If you rub your finger the length of them, they shouldn’t crumble – that’s a sign they’re old. Once purchased, take them home and if you must store them, put them in a paper bag or a basket covered with a moist paper towel and refrigerate. Don’t keep them too long – their shelf life isn’t more than a week and you don’t know how long it took them to get to you in the first place. I’d say eat them within 3 days or less of buying them.

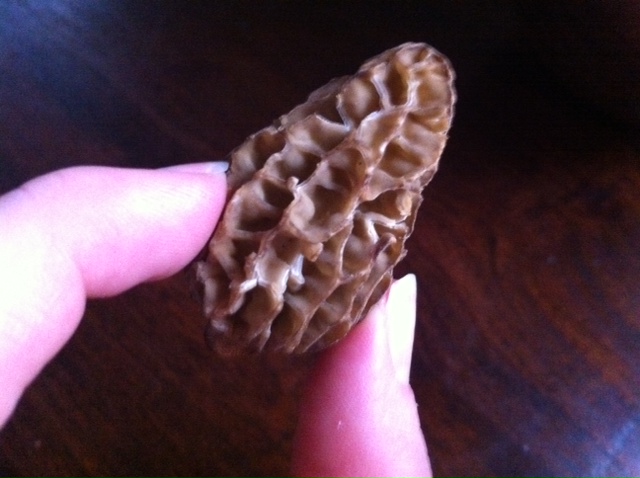
When you’re ready to prepare them, shake them up in their container to dislodge any loose debris. Rinse them thoroughly. Cut them in half (lengthwise). Fill a bowl with cold water and place them in it to soak. The folds of the mushroom are what you want to cleanse, so be sure they are brainy side down in the water.

I soaked mine for about 6 hours, replacing the water 5 times, stirring salt into the water for 2 of the 5 soaks and agitating them in the water at least once per soak. When I was finally ready to prepare them, I agitated them for a minute or two, then rinsed them thoroughly in running water before moving them to a towel and patting them dry.

Perhaps this is where I should mention that I’m obsessed with mushrooms and don’t mind putting this much work into them at all. Some of you may think this is ridiculous, and who am I to say you’re wrong. But I love mushrooms. So back to the recipe.

Simple Morels

  • 1/4 lb morels, thoroughly soaked (see above), halved, stems removed
  • 2 tbsp chopped parsley
  • 1 small leek, thoroughly cleaned and sliced
  • 1 clove garlic, minced
  • 1 – 2 tbsp olive oil
  • Sea salt to taste

Heat a small nonstick pan over medium heat. Add the oil. When the oil is hot, add the morels and a bit of salt. Cook them for a couple of minutes, then add the leek & garlic and a bit more salt, if desired. Cook the whole mixture for a total of about 5 – 8 minutes, until the morels have shrunken noticeably and are very soft. Remove from heat and stir in the parsley while still hot.

Serve as a tapa by themselves. Nom nom nom … In the meantime, I will work on coming up with something a bit more substantial to serve as a main course or something.

*Pronounced More- ELL (contrary to what my pun might suggest)

End Times Piña Colada and the See You In Hell Passion Fruit Mojito (Vegan)

That’s right, tonight we’re going to party like it’s May 20, 2011. Eat, drink and be merry, and then tomorrow we will party like it’s May 21st, 2011, and nothing unusual has happened because Harold Camping is a sociopathic ass who convinces people to ruin their lives and give him all their money in order to remind us all that we should thank our lucky stars we are not as vulnerable or gullible as his followers.

But seriously. I am astonished and amused at the idea of a doddering California radio personality captivating a global audience of thousands and convincing them that he alone among all humans for the past 2000 years has some profound insight into an ancient text (without even being educated on the languages in which it was written) that has eluded the most brilliant theological scholars for centuries and is able to accurately identify a date which even the Bible asserts can never be known by man or even angels. It’s the stuff that Dan Brown novels are made of. However, I do not find it funny at all that large numbers of people are quitting their jobs, abandoning their children, donating their life savings, and even committing suicide over these proclamations. I mean, really, Harold, could you possibly be any more evil without committing an indictable crime?

Let the record show that I am not religious. Nevertheless, I have plenty of religious friends who also know this Judgment Day business is bullshit. Christians and Jews and Buddhists and atheists and hedonists and pragmatists and jazz flautists alike can all at least agree on this point: Harold Camping is a jackass and we pity the shattered lives of his followers. The end.

With that said, we certainly shouldn’t miss an opportunity to celebrate Not The End Of The World, something that I hope we all do a little bit every day. Life is glorious and short and fragile and heartbreaking and amazing, and the best thing we can do for ourselves, our loved ones, and whatever higher power we might believe in or not is to appreciate what we’ve been given and not let it pass us by.

And for those of you who would like to sip a fruity cocktail while you wait for 6:00 pm to tick past tomorrow without any terrible earthquakes or crazy cultists ascending to heaven, I give you my following Rapture recipes …

End Times Piña Colada and the See You in Hell Passion Fruit Mojito

End Times Piña Colada*

  • 2 oz vegan rum
  • 8 oz pineapple coconut juice (available in the juice section of most Mexican markets)
  • 1/2 c. crushed ice

Place all ingredients in blender and blend for ~10 – 20 seconds. Pour into a tall glass and garnish with a maraschino cherry or umbrella or piece of pineapple or any combination of the above. Hint: When I make these, I usually quadruple the ingredients in the blender to make 4 drinks at once.

*Mind you, this is not a classic Piña Colada. Classic Piña Coladas are not vegan.

See You in Hell Passion Fruit Mojito

  • 3 oz vegan rum
  • 2 oz passion fruit juice
  • 1 lime, halved
  • Mint leaves from 8 sprigs or so
  • Ginger ale

Combine passion fruit juice, mint, and a splash of ginger ale in a tall glass. Lightly muddle the mint until it becomes slightly fragrant. Squeeze both lime halves in the glass and drop them in. Add rum and ice and stir. Fill the remainder of the glass with ginger ale and garnish with mint or lime or both.

For those of you on the East coast, I wish I would have thought of these sooner, because now you only have one more hour to party like it’s May 20, 2011. However, we will all have the rest of our lives to do so, and I don’t think we really need a fake Rapture to give us a reason to enjoy some delicious fruity cocktails.

Steamed Artichokes with Balsamic Mayo Dip (Vegan)

Yes, balsamic vegan mayo. Vegan mayo is one of a few wonderful dairy substitute products that make it possible for me to serve rich and creamy things without having to resort to extreme measures, like whipping my own tofu. I love vegan mayo, and I love the fact that it allows me to enjoy a balsamic mayonnaise dip with my artichoke that I would probably not enjoy as much if it were real mayo. Because let’s face it; no matter how much you love mayo, when confronted with it face to face, it looks kind of … oogy. The truth is that people enjoy mayonnaise the most when they don’t have to look at it.

With the balsamic mayo dip for artichokes, however, you do have to look at it, so it’s a good thing this one is vegan and not so sketchy-looking. In my case, I use Vegenaise brand fake mayo, however there are other varieties available, the most common being Nayonaise. Regardless of which brand you prefer, however, either will do the trick. Also, you always have the option of using real mayonnaise, and I’m sure it would be delicious. Though you may want to avert your eyes. 😉

One more thing before I begin – you will need a steamer for this. If you don’t have one, I urge you to buy one soon – they make it so much easier to cook so many things. Oh, the vegetables you’ll steam!

Oh, and I lied, there is actually one more last thing. This is not my original recipe, just a veggie version of another recipe I found. I’ve added a bit more direction and some vegan modifications.

Sssssssteam heat!

Essential kitchen accoutrement

Steamed Artichokes with Balsamic Mayo Dip

  • 2 artichokes
  • 2 lemon slices
  • 2 bay leaves
  • 2 cloves garlic, smashed
  • 1/4 c. vegan mayo or mayo
  • 1 – 2 tbsp balsamic vinegar (to taste)

For this recipe, it’s best to work with artichokes whose leaves have popped a bit; the really tightly closed ones are harder to clean and trim.

Rinse the artichokes under cool running water thoroughly, being careful to clean out any debris that may have gotten lodged down into the leaves. Cut off the rough end of the stem, being sure to leave about 1 – 3 inches of stem (the stems are super tasty!). Depending on which type of artichoke you have, you may wish to trim the tips off the leaves. This is mostly cosmetic, as you won’t be eating the tips, but for some of the spinier varieties, it may be worthwhile to minimize your own pricked fingers. To trim the leaves, just grab one, position your scissors and snip the tip. Simple as that.

Once your artichokes are ready to go, grab a large pot and steamer. Fill the pot with just enough water to touch the bottom of the steamer and add the lemon slices, bay leaves and crushed garlic to the water (under the steamer). They will lend a very subtle flavor to the choke. Place the steamer in the pot and position the artichokes in the steamer. Cover. Bring the water to a boil and reduce to a simmer. Pay attention to the water level while it simmers and make sure it doesn’t get down too low. I usually keep a tea-kettle of water cooking on the stovetop, ready to pour in a bit of water every 5 – 10 minutes or so.

The artichokes will need to steam for 25 – 45 minutes, depending on age, size, how well you keep the water level consistent, etc. When a fork easily pierces through the stem, they’re done. If in doubt, pull off a leaf and taste it. In my opinion, it’s better to have an overcooked artichoke than an undercooked artichoke.

Balsamic Mayo

Whips up in a jiff. Spoon the mayo into a small bowl (eg, a prep bowl or ramekin). Add the balsamic and whip with a fork. You may need to adjust the mayo/balsamic ratio to taste.

Serve alongside our prepared artichokes as a dipping sauce. Mmmmmmmm!

How To Eat an Artichoke

There are 3 tiers or artichoke goodness:

  • The leaves
  • The choke
  • The stem

The leaves and stem I think are self-explanatory, or at least, require minimal explanation. Pull the leaves, dip the bottom if you like, put the leaf in your mouth and drag your teeth across the bottom. Discard. When you get to the stem, just chow down. Yum! But before the stem comes the choke …

As for the choke. There are all those little spiny things. Don’t eat those. You can either scrape the spinies away with your spoon, or slice them off entirely with a knife. I have no strong opinion, except that scraping them is kind of fun. J sure loves it, to be sure. But it takes a bit of a knack, and if you’re impatient, you may want to just cut them out. Once the spinies are gone, feel free to bite right into the heart; it’s the best part of the choke, I think. If that isn’t a metaphor for the ages.

90 Second Tomato Quesadilla (Vegetarian)

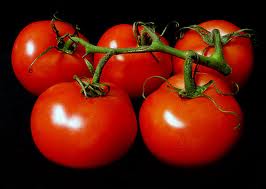
vine tomatoes, mmmmmmHi. This a not a shining moment for me, but because you are my very favorite blog readers, I am going to share it with you. As some of you may know, J is gone on tour for the month of May. As some of you may also know, although I am tremendously proud of him and happy that he is such a talented musician he gets to do cool things like tour Europe with Matmos, I am kind of a mess without him. My state of disrepair is not his fault, mind you – it’s mine, just so we’re clear. And he feels really bad about me being sad, so I try not to be too much of a drama queen. But alas, that goes so much against my nature. What can I say, I’m expressive.

Those of you who have seen it before will recognize the telltale signs of my month-long discombobulation. The syndrome is characterized by a number of things I am somewhat embarrassed of, but for which I shan’t apologize, because, well, it ain’t easy being green. The first and most obvious is my instantaneous insomnia (markedly worse than usual). The second is my profound lack of motivation to do anything productive (eg, go jogging, go to the post office, dust, read a book, etc). The third, and most relevant to you, my beloved blog audience, is that I have absolutely no desire to cook anything at all. For starters, J is my taster and second opinion – I feel blind without him. Then there’s the fact that it can be very difficult to cook for only one person – how do you not have way too many leftovers? Then there’s also the fact that one of my big motivators in cooking is the thought, “I want to make something delicious for J because he’s so rad!” So anyway. All of that. Which is why I haven’t developed anything new lately. Except for the 90 Second Tomato Quesadilla, of course.

Which brings me to the not-shining moment I referenced before. Since J’s been gone, I have been eating lots of junk food, including lots of cheese, and even seafood (vegans, please don’t be angry with me!). But some good has come of it. Allow me to introduce the 90 Second Tomato Quesadilla, which has been my dinner staple for more evenings than I’d like to admit. And yes, you really can make it in 90 seconds or less. It’s not hard at all. In fact, it’s so easy, it’s probably kind of silly for me to try to float it by as a “recipe.” Also, I’m sure most, if not all of you, know how to make a quesadilla. But do you know how to make it in 90 seconds or less? Um … anyway, I’m just hoping someone can benefit from my tribulations.

90 Second Tomato Quesadilla

(Makes one-is-the-loneliest-number quesadilla. I recommend doubling the ingredients and making at least two per person. Not just for metaphorical reasons, but because you’ll probably want more than one if you’re using the small tortillas, as recommended.* And naturally, if you’re serving more than one person, multiply accordingly.)

  • 1 half small vine-ripened or heirloom tomato, sliced and the slices halved (Do you have to use vine-ripened or heirloom? Well, it’s up to you, obviously, but I think they are more flavorful than other tomatoes.)
  • 1/4 c. shredded Monterey Jack cheese (Did you know it was spelled with only one “r”? Or that its inventor is disputed? Color me surprised, I always thought it was named for a different Monterrey.)
  • 1 small tortilla (~5 or 6 inch diameter) – I like Whole Foods Red Chile tortillas
  • 1/4 sliced avocado, sprig or two of chopped cilantro and salsa to taste, if desired

If you do this all in an incredibly efficient fashion, I promise you it won’t take longer than 90 seconds; in fact, it will probably only take about a minute. However, if you’re slicing avocado or chopping cilantro, I would anticipate that could potentially add up to a minute or so. And if you’re serving multiple people, then the 90 second thing kind of breaks down. Truly, this is a quesadilla designed for solitude.

Shred about 1/4 c. of Monterey Jack cheese with a grater. Place the tortilla on a microwave safe plate and sprinkle the cheese in a circle in the middle, leaving about 1/2 inch border between the cheese and the edge of the tortilla. Pop it in the microwave for 35 seconds.

Meanwhile, rinse your tomato and cut a few slices. Halve them, and they’re ready to place in your quesadilla. This would also be the time to slice your avo or chop your cilantro (if you hadn’t done so in advance).

When the tortilla with cheese is done in the microwave, place the pieces of tomato in the middle. This is also when you would place the avo and cilantro, if desired.

Fold up like a mini-burrito, and serve immediately. (Don’t dally; they’re not very good cold.)

*If you’re using larger tortillas, adjust the ingredients accordingly.

Wild Mushrooms en Papillote (Vegan or Vegetarian)

They're not your father's Freedom Fries

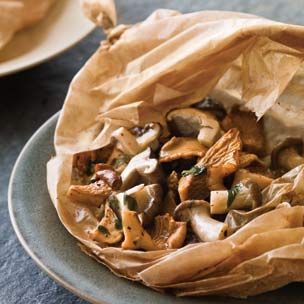
Photo property of Williams-Sonoma

You might have noticed a recurring theme. I’m way batty for mushrooms.

This time I decided to break away from my normal preferred mushroom cooking method and try something different. It’s a slight adaptation of a gem from my home skillet Billy S and certainly an easy way to cook mushrooms if for some reason you find it impractical to saute them on the stove top. The only thing is that I’m not sure if there’s any real advantage to preparing your mushrooms en papillote, other than to sound French, impress Martha Stewart or delight your guests with mushrooms from a paper bag. Some say that this method is healthier because it cuts down on the amount of oil you cook with, but a) you’re replacing it with butter or margarine; and b) cooking mushrooms stove top doesn’t really call for all that much oil. So I don’t know what that’s about. One thing I can say is that cooking your mushrooms this way will result in slightly softer, less browned mushrooms, so if you’re trying to control texture and presentation, that could be a reason to choose the papillote method.

Three important departures from the Billy Sonoma version that I’ve included here: 1) Omitted the parsley because I was serving them in an arugula salad and didn’t need the extra bitterness; 2) After steaming them in the parchment for about 10 minutes, I opened up the bag to dry them out a bit, because they had produced quite a bit of moisture, as we all know our fungus friends are wont to do; 3) Added red pepper flakes, because you know I love the spicy, yo.

One last thing. If you’re wondering where you can get your hands on some parchment, you can find it in most grocery stores in the aisle with aluminum foil and wax paper.

Wild Mushrooms en Papillote

  • 1 tbsp vegan butter or unsalted butter, plus 1 tbsp vegan butter or unsalted butter, cut into small pieces
  • 1 lb mushrooms, brushed clean – I used shiitake, trumpet and almond mushroom (random farmer’s market find), but you could use any combination of mushrooms you like
  • 1/2 tsp ground sea salt
  • 1/4 tsp freshly ground pepper
  • Red pepper flakes, to taste
  • 1 tsp fresh lemon juice

Preheat an oven to 375°F.

Cut parchment paper into an 18-by-11-inch rectangle. Fold the rectangle in half crosswise. Open the parchment and coat with the 1 tbsp butter. Place the rectangle, buttered side up, on a baking sheet.

Cut the mushrooms into bite-size pieces and place in a bowl. Add the salt, pepper, butter pieces, lemon juice and toss well. Spread the mushrooms over one half of the prepared parchment paper. Fold the other half of the parchment rectangle over the mushrooms and fold the vertical edges over twice, working your way along the edge of the paper to end with a twist on both ends. Place the package on a rimmed baking sheet.

Bake until the parchment packet is puffed and the mushrooms are cooked through, about 10 – 12 minutes. At that point, do a progress check – have they thoroughly juiced? If so, go ahead and carefully open up the parchment and return them to the oven for another 1 – 3 minutes to dry out any lingering liquids. Transfer the parchment packet to a platter and serve immediately. (Or, if you’re making a salad, add them to the salad and serve immediately. More on the salad coming soon.)

The Morel of the Story …

First, I want to warn you that there is no recipe herein, only a cautionary tale. As I’ve said before, part of my charter is to share the fruits of my experiments, both the successes and failures, so that you don’t have to endure the heartaches I have. That said …

Morelly questionable

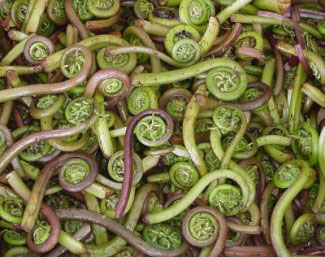
Earlier this week I undertook to make something with morel mushrooms for the first time (pronounced “more-ELL,” contrary to what my post title pun would suggest). Actually, my original intent was to capitalize on the short-lived fiddlehead fern season and make something with fiddleheads again, and since I just recently bought this new cooking reference, The Flavor Bible, I looked up fiddleheads to see what accompaniments America’s greatest chefs recommend for them. You guessed it, morel mushrooms. And I thought “Yay, I’ve always wanted to cook insanely expensive mushrooms in an experimental recipe that is bound to epically fail!” Just kidding. Actually what I thought was, “Yay, I’ve always wanted to cook insanely expensive mushrooms that have the consistency of tripe and are notoriously difficult to rid of grit, rendering their resulting dish inedible.” OH, I’m still kidding. What I really thought was “Yay, mushrooms that look like brains are just like what Mom used to make!”

Okay, enough. What I really thought was “I think I’ll go with chanterelles, unless Whole Foods doesn’t have chanterelles, in which case I’ll get the most interesting mushroom they have that seems in good shape.” But I was never expecting Whole Foods to have morels. No one here ever has morels. Nevertheless, there they were. So I decided to go for it. Everyone raves about them and all. And I’m an adventurous cook if anything. What could possibly go wrong?

Oh SO MANY things went wrong. You know, in retrospect, I probably should have taken it as an omen when, earlier that day as we were driving past a golf course near our house which we’ve driven by HUNDREDS of times, a golf ball came flying out of nowhere and bounced off the hood of my car while we were driving about 50 mph. Certainly you could say we were lucky that it didn’t hit and break our windshield and kill one or both of us, so don’t get me wrong – I’m definitely grateful. But I can’t shake the feeling that the statistical unlikelihood of such an event is actually hard proof of my UNluckiness. Certainly it carried the portent of imminent mushroom disaster.

But I digress. Morels.

Braaaaiiiiinnnnnsssss ...

They’ll warn you that morels are gritty and should be carefully cleaned to rid them of grit and creepers. At the same time, they’ll tell you not to have them in water too long because it will rob them of their flavor. I can verify that the former is definitely true. I can’t comment on the latter because I don’t know what my morels tasted like before I rinsed and soaked them, but I do know that the resulting flavor of the still grit-inclusive morels I had was not remarkable in any way, and certainly did not offset the unpleasant tripe-like consistency either.

I won’t bore you by relating my subsequent misadventures with the vegan gnocchi I served them with – that’s another story for another day. I will leave you instead with a solemn word of caution that if you undertake to prepare morel mushrooms, do take the cleaning of them very seriously. For your information, here are the steps I followed, which were clearly insufficient:

  • Shook vigorously in a paper bag to dislodge any easily dislodge-able debris
  • Tapped each mushroom several times on a hard cutting-board surface to shake out any remaining bits
  • Plunged and swirled mushrooms in bowl of cold water, discarded water & repeated 5 times
  • Sliced each mushroom in half and rinsed out insides
  • Inspected for remaining schmutz – didn’t see anything

So anyway. In my research I found a few sources who recommended soaking them for a long period of time in water or even in salt water (in case of unwanted crawlie guests), though I found far more sources claiming that they should only be briefly submerged to avoid the afore-mentioned flavor weakening. I thought my approach was a safe compromise but apparently not. The morel of the story is I’m not sure that morels are worth it.

I’d welcome your thoughts and experiences of morels – anyone?

Sauteed Fiddlehead Ferns (Vegan)

Feed me Seymour

Wild fiddlehead ferns

Remember those fiddlehead ferns I mentioned with my Chik’n Marsala recipe? These are they. Let me tell you a little something about fiddlehead ferns. They’re  magnificent and delicious, and, also, they totally look like aliens. Apparently they’re only available for about three weeks of the year, and mostly in New England, so if you’ve never seen or heard of them, it’s not surprising. I’d never seen or heard of them myself until I saw them through the window of the doorway at Whole Foods one day, and thought “That plant in the window, it’s simply amazing! Oh, while I’m here, I might as well take a hundred dollars worth of roses.”/nerdy Little Shop of Horrors reference

But seriously folks. There are some things people should know about fiddleheads before cooking them, and apparently some of them can cause GI illness if not prepared correctly, though generally speaking they’re safe and delicious. You just need to cook them thoroughly. And not eat them raw.

As far as what they taste like, they’re not very far from asparagus or broccolini, with a super green freshness, slight nuttiness and hint of bitter aftertaste.

By the way, this recipe is not my invention. I found it at Earthly Delights. But I scoured pages and pages of recipes to find ideas for the perfect simple treatment, and it wasn’t easy to find, so I wanted to make it easy for you.

Sauteed Fiddlehead Ferns

  • 1 lb fresh fiddlehead ferns, tightly closed
  • 2 quarts boiling water
  • 1 tsp freshly ground sea salt
  • Ice water
  • 4 tbsp vegan butter or margarine (or you could use regular butter for a vegetarian version)
  • 1 tbsp fresh lemon juice
  • 1/2 teaspoon freshly ground pepper

Clean and trim the fiddleheads, snipping off the tough stems or any brown unsightly parts. Rinse in cold water – you may need to go through a few rounds of cold water until it’s clear. Meanwhile, boil two quarts of salted water and have a bowl of ice water on hand.

When the water is boiling, add the fiddleheads. Return to a boil and cook for only about two or three minutes, timing it carefully. Strain the boiling water and dunk the ferns immediately in ice water. Drain the fiddleheads and pat them dry.

Meanwhile, in a large skillet over medium heat, melt the butter. As it begins to bubble, add the blanched fiddleheads. Sauté for about two minutes, then add the lemon juice and stir thoroughly. Season with salt and pepper and remove from heat. Serve immediately.

Chik’n Marsala (Vegetarian)

Chik'n Marsala, Garlic Mashed Potatoes and Fiddlehead Ferns

Two presentations of Chik'n Marsala, Garlic Mashed Potatoes and Fiddlehead Ferns. Recommended wine pairing: Pinot Noir or Chardonnay

I guess I was feeling nostalgic for home on my dad’s birthday (4/08), because I was trying to decide on something new to cook for dinner and thought, “Hey, I should make vegetarian chicken marsala!” See, my dad used to make it all the time while I was growing up. But I don’t think it had occurred to me until just that moment how much I’ve always missed it.

So, I did some research on different recipes and came up with a general plan, then ran my ideas by my dad. He had some suggestions, and this recipe is the culmination of  it all. J and I really enjoyed it, but I will probably tweak the sauce a bit in the future, so stay tuned for updates. And by all means, if you try it yourself, please let me know what you think.

Oh yes, and one more thing. Apologies to my vegan compadres, but I used Quorn vegetarian chik’n filets in this one, which are made with egg products. Unfortunately Quorn is the only brand I am aware of that offers an actual unseasoned filet. (All the vegan varieties are either pre-seasoned or breaded. Sob.) And since its veganhood was already compromised, and since we just happened to randomly have butter in the house (long story), I went ahead and made it with butter too, though you could certainly skip the butter if you prefer. And if you find any unseasoned vegan chik’n filets out there in the world, please let me know.

Chik’n Marsala

  • 4 Quorn chik’n breasts
  • Enough flour to lightly coat the chik’n
  • 1 shallot, diced
  • 2 cloves garlic, minced
  • Fresh ground sea salt and black pepper
  • 3 tbsp olive oil
  • 1 lb crimini mushrooms, sliced (My dad had suggested using shiitakes to stand in for the meat flavor of the chicken, which I agree would have been a good choice, but the shiitakes at the market were looking pretty sad, so I went with criminis this time. Either will suffice.)
  • 1/2 c. marsala wine
  • 1/2 c. vegetable stock (I used a mushroom-based stock.)
  • 2 tbsp butter (Optional, though I recommend it for a smoother, more balanced sauce. More on this below.*)
  • 1- 2 tbsp lemon juice

Mix up a bit of flour, salt and pepper in a bowl big enough to pseudo-bread the chik’n filets. Dip the filets in the flour to lightly coat them. Keep the flour nearby in case you need it to thicken up the sauce at the end.

In a large skillet on medium-high heat, heat the olive oil. Place the filets in the pan and fry about 5 minutes on each side, until they are golden brown. Remove from the skillet and place on a platter in your oven or microwave to keep them warm.

In the same pan on medium heat, add the mushrooms (heat a bit more oil first, if necessary). Toss in oil and saute for a minute or two, then cover until they juice, stirring occasionally per my standard mushroom protocol, about 3 – 5 minutes. Remove cover and continue to cook until the juice is reabsorbed. Season with salt and pepper to taste, being mindful that the soup stock may have additional salt.

Add shallot and garlic and saute just a bit longer, until the shallot is slightly softened. Add the marsala and lemon juice and cook for about a minute to reduce. Add soup stock and simmer for a couple minutes more to further reduce.

This is when you should add the butter, if you so choose. Personally I had been on the fence about the butter up until this point, but the sauce was not as thick as I wanted it to be, so I went ahead and used it. The addition of the butter made the sauce much richer and smoother, and also had the effect of bringing the flavors of the wine and mushrooms into better balance. It would have been fine without it, but for those of you who don’t mind butter, I’d recommend it.

If, after all this, the sauce is not quite as thick as you’d like, stir in a bit of flour (I used about a teaspoon) to reach desired consistency (I know, using flour is cheating, but whatever. Life is too short to wait around for every single sauce to reduce). Return the chik’n filets to the pan and simmer gently to reheat. Voila, dinner ees serfed.

Note that I decided to serve this dish with garlic mashed potatoes (recipe coming soon) and fiddlehead ferns. But any combination of starch and green vegetable would be excellent companions. Try rice and broccoli. Try pilaf and asparagus. Try orzo and green beans. Or any combination thereof. Or try something else entirely, you are certainly not limited to starch and greens. Whatever floats your boat, my friends, I’m sure will be divine.

Creamy Asparagus Soup (Vegan)

asparagus

This is the dawning of the age of asparagus.

Here’s how this soup happened. We were at the farmer’s market, and J was like “Ooooh, asparagus. Should we buy some?” And I was like, “Um, really? Uh, suuuure … I’ll use it to make asparagus soup.” And J said, “Great. What else do we need for asparagus soup?” And I said “OH, nothing.”

Which I knew probably wasn’t true, because I had no idea how to make asparagus soup. But for some reason I had a totally irrational moment where I thought that if J knew I had no idea how to make asparagus soup then he would try to stop me from making it. Which he never would have done. I have no idea what got into me. It was like I was momentarily possessed by the spirit of my 5-year-old self. And then I found myself in the situation where I had to figure out how to make it. So I spent a sizable chunk of time reading asparagus soup recipes and eventually concluded that I was pretty much on my own. Basically they just all seemed really boring and not what I wanted. Worse still, they all called for making a soy milk roux, and you know how I feel about making roux with soy milk (soy milk + flour + oil = liquid chalk). So, I made up my own. It’s kind of a hashing together of a few recipes with variations based on my personal preferences. Here it is. J and I both loved it.

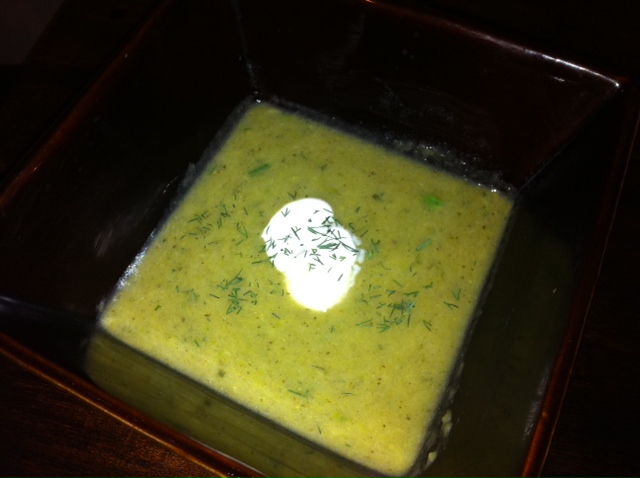
Creamy Asparagus Soup

  • 2 tbsp olive oil
  • 1 lb asparagus
  • 1 stalk celery, chopped (including leaves)
  • 1 onion, chopped
  • 1 medium-sized potato, thinly sliced
  • 2 c vegetable stock (for this one I used a parsley-based stock)
  • 2 c water
  • 1 1/2 tsp salt
  • 1 1/2 tbsp fresh dill, minced
  • 1 – 2 tsp white pepper, to taste (possibly more if you love white pepper as much as I do)
  • Tofutti sour cream to taste

First, prepare the asparagus by breaking off the rough ends. You can do this by holding the very end in your fingertips and bending the rest of the stalk until it snaps. The rough portion should break naturally at the place where it’s supposed to, usually around an inch or so from the end. (Thanks to J for this tip!)

After breaking off all the ends, slice off the tips of each stalk (usually about an inch or so) and reserve for later. Take the remaining stalks and slice them in approximately 1 inch pieces.

In a large Dutch oven or stockpot on medium heat, heat the 2 tbsp olive oil. Add the celery, potato, asparagus stalks (not tips) and salt. Toss in oil and saute for ~5 – 8 minutes or until vegetables are tender, stirring regularly. Add stock and water and bring to a boil. Reduce heat to a simmer, semi-cover and cook for around 5 – 10 minutes, until a knife easily penetrates vegetables (timing depends on size of your veggies and how tender they were after sauteing).

In the meantime, steam the tips for about 5 – 8 minutes, or until tender.

After the soup is done simmering, puree it in a food processor or blender until smooth. Return the pureed soup to the pot on very low heat and add the steamed asparagus tips. Cook a little bit longer (~2 minutes) but be very careful not to overcook or let the soup boil.

Ladle into bowls and garnish with a dollop or two of sour cream and sprinkling of dill. Serve immediately.

Zucchini Relleno with Lentils (Vegan)

Calabacines rellenos con lentejas

There I was minding my own quiet business waiting for my delicious burrito-to-go from Humberto’s, when lo-and-behold I spied to my right a little Spanish-language classified news rag that had “RECETAS! p. 38” in bold on the side. And I was like, RECETAS! OMG! There’s nothing I love more than recetas, because if it’s a recipe, and it’s in San Diego, and it’s in Spanish, there’s a 90% certainty it will be fantastic. Even if it was sponsored by Nestle. Which it was.

And that being the case, and deliciousness of the recipe aside, I question whether the person who wrote it out ever actually made it, because a lot of the directions were totally wonky. If I had naively followed them, the outcome would have been disastrous. Fortunately, I *slightly* knew what I was doing, and I feel confident that you can trust this version, although I have included a few notes throughout. But don’t worry. Even if you’re not an adventurous cook (and there’s nothing wrong with that – life is too short for bad food), you can’t go wrong with this one.

For the record, I’ve made no explicitly vegetarian/vegan modifications to this recipe, as its original purpose was to serve the Spanish-speaking community with vegetarian recipes for options during Lent. The modifications I’ve made were strictly of the “it is better to make it this way” variety.

Zucchini Stuffed with Lentils

  • 6 zucchini, cut in half lengthwise, stems cut off, scooped of pulp & seeds
  • 3 – 4 tbsp vegetable oil (divided use)
  • 1 medium white onion, diced
  • 1 – 2 serrano peppers, de-seeded and minced
  • 3 large cloves garlic, minced
  • 1 1/2 cups lentils
  • 10 oz tomato sauce
  • 2 tbsp Maggi seasoning sauce (you can find it near steak sauces or in the Mexican food isle or at Mexican food markets; if you can’t find it, soy sauce would work – though Maggi has this strange aromatic-ness that is better)
  • Diced cilantro for garnish, to taste
  • Dry loose cotija for garnish, if desired (of course this will render it no longer vegan)

Slice and de-seed/de-pulp 6 zucchini in preparation. I recommend a spoon for the de-pulping. Additionally, please note that each halved zucchini is about 1 side serving, and once they are cooked they don’t keep well. Hence, if you are cooking for a small bunch I would recommend only preparing the number of zucchini halves you expect to eat. For instance, J and I would only prepare 2 zucchinis, for a total of 4 halves. We’d save the remaining lentil mixture and prepare the zucchinis on an as-needed basis. Does that make sense? Am I over-complicating things? I can do that sometimes. Anyhoo, back to the recipe.

Follow the instructions on the package to cook the lentils (usually ~ 20 minutes/2 cups lentils). If you bought bulk lentils, here’s a quick explanation of how to prepare them.

For the mixture:

Heat 1 tbsp of the veg oil in a large pan on medium heat. Add the onion, garlic and pepper and cook, stirring frequently, until onion is soft. Add the cooked lentils, tomato sauce and Maggi sauce and cook, stirring frequently for about 2 minutes, until everything is hot. Remove from heat. Fill the zucchini halves uniformly with the lentil mixture. Now, you have two final options:

If you want to cook the stuffed zucchini stovetop:

Add the remaining 2 – 3 tbsp of oil to the original pan and heat on medium-low. Place the zucchini in the pan and heat for about 10 minutes or until tender.

If you want to bake the stuffed zucchini in the oven:

Preheat the oven to 350 degrees. Bake the stuffed zucchini on a baking sheet or in an iron skillet for about 10 minutes, or until tender. This option is healthier as it requires no oil, but it may result in dryer zucchinis.

Serve immediately with salsa,* cilantro and optional cotija as a garnish. When removing the zucchinis from the pan to serve, use a spatula to avoid a crumpled zucchini fiasco.

A NOTE ABOUT THIS RECIPE: I really liked my first attempt at this but felt there were many improvements that could be made. I will continue to experiment with it and promise to provide updates in the future. Please check back!

*If you’re in San Diego in the greater park area, head over to JayCee’s on 25th & C – they have this excellent fresh homemade salsa in the back of the store in the refrigerated section near the meat counter by the Oaxacan queso. We like the hot version, but all of the varieties are excellent.